Posts

Showing posts with the label Nuke tutorials

connectCamera script for nuke

Image
connectCamera python script for nuke connectCamera script helps users to connect with any camera from anywhere in their nuke script. When you run this script it will find all the Camera's from the script, pops a window to choose the desired "Camera" from the list. When you hit connect this script it will create a "Dot" node and connect with the selected camera. Also, add the selected camera name to the Dot. Example video: Download the script: https://github.com/satheeshvfx/Nuke_python_codes/blob/master/connectCamera.py Raw code: ### connect camera v1.0 ### connects user selected camera using a Dot node anywhere from the script ### for bugs and reports satheesrev@gmail.com ### thanks to Wouter Gilsing for helping out to make this happen import nuke def connectCamera(): ###getting list of camera's available in the script cameraNames = ' '.join([n.name() for n in nuke.allNodes('Camera2')]) if ...
Export Maya camera and Objects to Nuke

Image
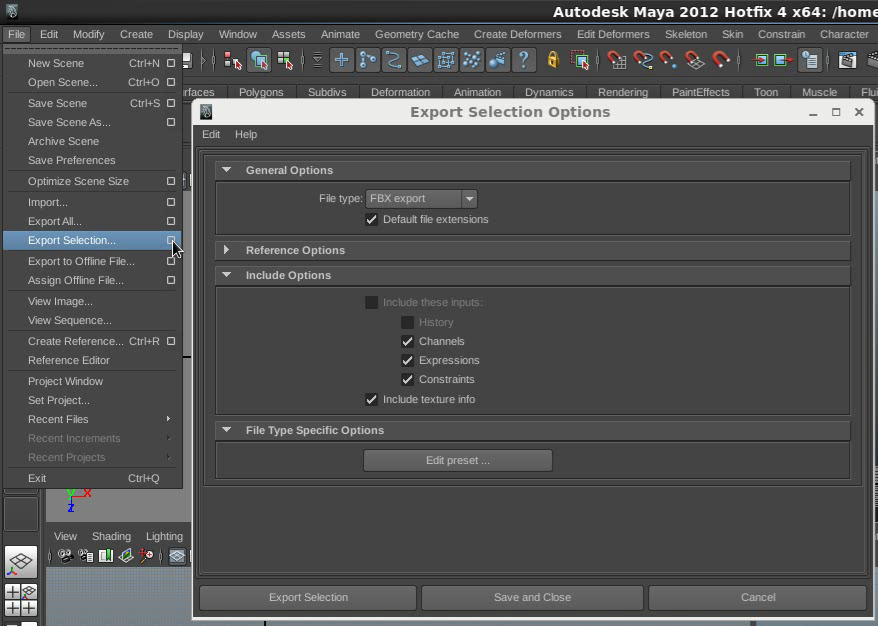
Export Maya camera and Objects to Nuke Exporting Maya Camera and Objects to Nuke is really night-mare. Using .fbx file format will fail most of the time. Scene not align perfectly, meshes not displaying properly, Camera missing the key-frames, etc. Reason for this is both the software's handling Cameras in different manner. There are several scripts available for exchanging data's between mayaToNuke. Each one having their plus and minuses. I found a clever python script to do the data exchange successfully. I done some custom with the original script and used it several time with out any failure. I created a new maya scene for tutorial purpose with animated camera and couple of objects. Maya to nuke traditional export method: Step-1: Selected all the objects and Camera. Step-2: Go to  file---> Export Selection.... step-3: Go to Edit Presets and Change fbx format to fbx2010. step-4: Export Selection and save it as a .fbx file. step-5: Added ReadGeo ...

switchMatte

Image
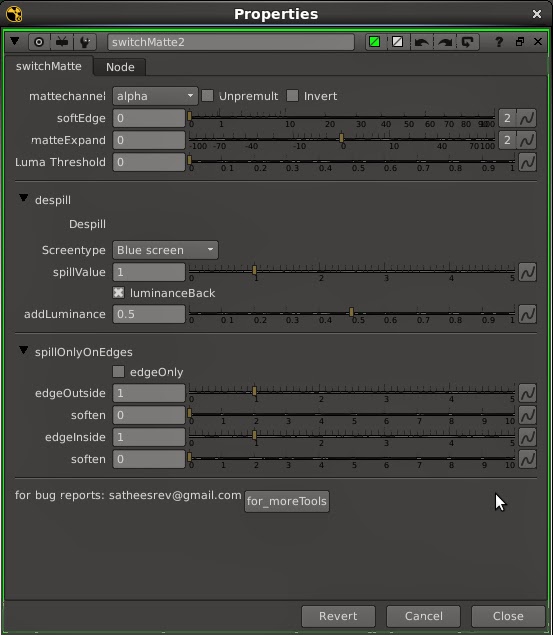
switchMatte v2.0 So long before i created this tool for my personal use. Recently improved the tool with extra control's. switchMatte v2.0 works like shakes switchmatte and Fusion matte control. Added spill control with in the node So user no need to add extra Spill nodes. switchMatte v2.0 interface. Matte channel drop-down menu allowing you to choose the matte channel. User can expand and blur the alpha channel. Luma threshold slider can increase and decrease the luminance value. Despill menu allowing you to remove the spill from the image. spill only edges control the despill area.  Download and play with this tool and leave the comment and requests. Download: http://www.nukepedia.com/gizmos/channel/switchmatte

nuke particle templates

Image
Nuke particle Templates Hi nuker's this page dedicated for nuke particle templates. I will keep update this page with different nuke particle template's. Enjoy....  1. sparks ( welding sparks) This is simple sparks, you can manipulate as per your need. Download: sparks_v01.nk

paintNodeOpacity.py

Image
paintNodeOpacity python code This little code will help you to control nuke "rotopaint" nodes clone & paint brush opacity via some short-cut keys. I created this code for my fellow artist who's working with me in paint department. Short-cut keys are assigned as per his need. You can use your custom short-cut keys. There are 5 control option. "shift+>",  "shift+<" user can up & down the opacity value using "shift+>" and "shift+<" . This will jump between current value to +0.05 or -0.05. If your value will 1 it start to decrease 0.95, 0.9, 0.85 so one so forth.... "ctrl+>", "ctrl+<"  user can up & down the opacity value using "ctrl+>" and "ctrl+<" . This will jump between current value to +0.01 or -0.01. If your value will 1 it start to decrease 0.99, 0.98, 0.97 so one so forth.... "ctrl+Shift+< " and "ctrl+Shift+...

Help full Nuke short-cut's

Image
Some cool and very help full nuke short-cut's Here i'm going to share some cool and very help full nuke short-cut's with you friends. These are all my favourite short-cut's inside nuke. 1. "ctrl+up arrow or ctrl+down arrow" you can move your selected node to above or below the next node. But this will not work with multiple nodes. You cant move multiple nodes with this short-cut. (you can create some python code for doing this) 2. "crtl+shift+c" This will pop-up the selected nodes "tile_color" picker window. You can color code the selected node or nodes same time. 3. "ctrl+right arrow & left arro w" This will jump into half of the time in your time line. example: If your current frame is 50 ctrl+left arrow will jump to 25th frame. If you give it again it will jumb into 13. Your mouse should in viewer window. This short-cut also work with key frames. you can jump in-between the...

chromatic aberration

Image
chromatic aberration  Most people doesn’t understand What is "chromatic aberration"and struggle to handle it on post production. Here is simple solution to understand and produce good result in post. First is first.. What is chromatic aberration? Chromatic Aberration, also known as “color fringing” or “purple fringing”, is a common optical problem that occurs when a lens is either unable to bring all wavelengths of color to the same focal plane, and/or when wavelengths of color are focused at different positions in the focal plane. for more info: http://toothwalker.org/optics/chromatic.html Look below image Right side. You can see the red color (fringing) bleeds on the object edges.Its because of chromatic aberration.  How its happen? Chromatic aberration is caused by lens dispersion, with different colors of light travelling at different speeds while passing through a lens. As a result, the image can look blurred or noticeable colore...

Getting roto shapes name

Image
Getting roto shapes name gettingRotoNames.py script will print all the "Roto" shapes and "Layers" name in all the Roto nodes.  This script goes down 4 child layers deep and get all the shapes and layers. If want to go further you can add some more by editing this code.  def gettingRotoNames():     for rpNode in nuke.allNodes('Roto'):         cKnob= rpNode['curves']         root = cKnob.rootLayer         print '\n' + root.name         for e in cKnob.rootLayer:                print ' - ' + e.name             if isinstance(e, nuke.rotopaint.Shape):                 pass         ...

randomRotoColor

Image
randomRotoColor Created a node with python button called "randomRotoColor". It applies random color values to the individual roto shapes on selected roto nodes in nuke. Nicolas Houle made this script for help me out. I made some manipulation on that script and make it work really handy. You can apply random overlay color value to each roto shapes. Add this node into your node-graph. Select the roto nodes ( multiple or single ) and click the randomRotoColor button. Your roto shapes are changed their color values randomly from default white color. Before: After randomRotoColor applied: I made it randomRotoColor gizmo. you can download it from below link. https://skydrive.live.com/redir?resid=776F8351D9892B6A!268 else copy below code and run it from nuke's script editor: def randomRotoColor(elem): for i in elem: if isinstance(i, nuke.rotopaint.Layer): randomRotoColor(i) elif isinstance(i, nuke.rotopaint.Shape): attrs...

Lock and unLock node settings in nuke

Image
Lock and unLock node knobs Nuke doesn't have inbuilt function for lock the node settings( knobs, sliders), Like fusion's node lock function. While working with bigger scripts most of the time we accidentally  adjust the node sliders with out knowing which node is selected. ( what the hell is happening i didn't adjust anything..... ????!!!!! ) This code lock selected nodes knobs. So no worrier’s about accident changes. Right click on the nodes property panel. You will get knobLock & unlock short-cut key. menu.py: import lockNode nuke.menu("Properties").addCommand('lock_Knobs', 'lockNode.lockNode(True)') nuke.menu("Properties").addCommand('unlock_Knobs', 'lockNode.lockNode(False)') Download:  locknode.py Hope this will help you friends.

working with bounding box in Nuke

Image
Working with Bounding box. What is bounding-box: The bounding box is described by 4 numbers. The x-y coordinates of the lower-left corner of the image, followed by the x-y coordinates of the upper-right corner of the image. Its really important for every compositing artist to be aware of bounding box. While working with complex shots, setting-up bounding box in a right way will reduce the computing process time while previewing and rendering. Here i am explaining how to manage bounding box inside Nuke on efficient way. Each shapes have their own bbox. When its come together ( merging in compositing B+A = B or A) Its create a new bbox. Here is the final result when merging two inputs as one. While compositing different resolution(size) of inputs. Boundingbox scaled up then project size. In this example i used a panorama BG with some tracking information. Defocus node defocus the entire panorama image it will take a long time. Look at the bbox size in t...